State machines are a well defined concept that developers all around have been using, some without even knowing it.
Finite State Machines
Finite state machines are basically a control flow, a sequence of states and a define set of rules about the transitions between those states.
One of the best examples of that are shopping carts, it has pretty well defined states, and a set o triggers to transition it from one state to another.
Let’s check an example bellow:

As detailed on the imagine above we can see a set of defined states:
- Empty
- Filled
- Payed
- Abandoned
Each transition is triggered by a specific function, but there is even more into it, some transitions can trigger other callbacks, or even have guard conditions, let’s see how that looks once we put it all together:
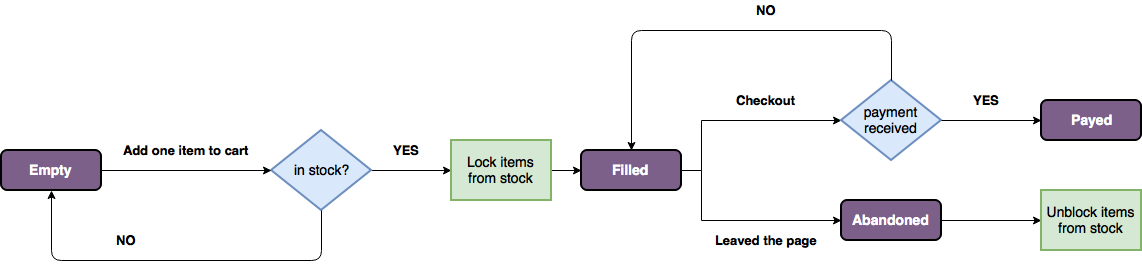
Okay, that escalated quickly. As you can see, once you include the callbacks (green) and the guard conditions (blue) the logic starts to get more complex and the code can start to get messy.
After an initial implementation, as the state machines gets more complex, some logic will probably start to be split and fall all over the place, there will be callbacks on controllers, some as private functions some not, maybe some guard conditions will end up as validations on models, well you can get the whole picture, it’ll soon became unsustainable to keep extending it. Some other developers might go another routes and just put it all on the model, what some might consider an even worse bad smell.
So the question remains: how to implement useful state machines on Elixir without a bunch o boilerplate and/or messy code?
Machinery
Machinery is an open source library I’ve been working on the last months, it’s a thin State Machine library that integrates with Phoenix out of the box, but you can use it in any Elixir application, even not a Phoenix one.
It’s just a small layer that provides a DSL for declaring states, having guard clauses and callbacks for structs in general. It also has (when implemented with Phoenix) an optional build-in GUI that will represent each resource’s state.
Machinery is built to work with any structs and also offer you the ability to have different states machines.
How to use it
The package can be installed by adding machinery to your list of dependencies in mix.ex
def deps do
  [
    {:machinery, "~> 0.12.1"}
  ]
end
Be sure to also add a new field to the struct that will have the state, you want to make sure that is a string. If you have a Phoenix app it will involve create a new migration and changing the model accordingly.
Declaring States & Transitions
After that, you can create a new module to hold your state machine logic, in there you will declare your states, valid transitions, callbacks and guard conditions.
You will later down the road pass this module as an argument to be used when changing states.
defmodule YourProject.UserStateMachine do
  use Machinery,
    # The first state declared will be considered
    # the initial state
    states: ["created", "partial", "complete"],
    transitions: %{
      "created" =>  ["partial", "complete"],
      "partial" => "completed"
    }
end
Transitioning to new state
After having that in place you can transition state from anywhere on your application using Machinery.transition_to/3, it expects three arguments:
- The struct that holds the state
- The state machine module we just declared
- The state we want to transit it to
Machinery.transition_to(your_struct, UserStateMachine, "next_state")
# {:ok, updated_struct}
That is just the initial implementation, let’s not forget that you can still declare the callbacks and guard functions, let’s check how to implement those using machinery.
Guard Functions
Guard functions or guard conditions, are functions that you can declare inside your state machine module, it’s expected to return a boolean value, if true it will let the transition occur and if false it’ll block it.
As you might notice, you should use the second argument to pattern match what state you want to guard.
# Guard the transition to the "complete" state.
def guard_transition(struct, "complete") do
  Map.get(struct, :missing_fields) == false
end
Before and after callbacks
Before and after callbacks are pretty straightforward, you should declare it inside the state machine module as well, it’ll execute any code inside this function before or after the transitions occurs, it’ll receive the struct as argument and it’s expected to return the struct back.
Here as well, you should use the second argument to pattern match into what state transition you need to trigger the callbacks.
# callbacks should always return the struct.
def before_transition(struct, "complete"), do: struct
def after_transition(struct, "complete"), do: struct
Persisting state
Keep in mind that Machinery won’t update your database automatically, but it can if you tell it how (because that may depend on what you’re using to store your data). The way you are expected to do it it through a function called persist/2:
persist/2 should always return the updated struct.
defmodule YourProject.UserStateMachine do
  alias YourProject.Accounts

  use Machinery,
    states: ["created", "complete"],
    transitions: %{"created" => "complete"}

  def persist(struct, state_you_are_transiting_to) do
    # Updating a user on the database with the new state.
    {:ok, user} = Accounts.update_user(struct, %{state: state_you_are_transiting_to})
    # Returning the User struct as it should.
    user
  end
end
The shopping cart flow
Let’s check a real case scenario and implement the initial cart behavior described on the flow charts I shared earlier and see how that would look like:
defmodule FakeProject.ShoppingCartMachine do
  # We start by declaring all states and
  # each permitted transition.
  use Machinery,
    states: ["empty", "filled", "payed", "abandoned"],
    transitions: %{
      "empty" =>  "filled",
      "filled" =>  ["payed", "abandoned"]
    }

  def guard_function(cart, "filled") do
    # Check if there is enough of this item in stock
    # it returns a boolean, if true it will move on with
    # the transition, if false, it'll block it and keep
    # the previous state
    Item.has_stock?(cart.item)
  end

  def guard_function(cart, "payed") do
    # Check if payment is received and return boolean
    # if it returns true the transition will be allowed
    # to happen
    Payment.status(cart) == :confirmed
  end

  def before_transition(cart, "filled") do
    # A transition callback that will perform an action,
    # in this case right before the transition occurs,
    # locking the items on a cart to prevent another
    # customer from adding it if there is not enough stock.
    Item.lock_form_cart(cart)
    cart
  end

  def after_transition(cart, "abadonned") do
    # An after transition callback, it's used to perform
    # an action after a transition.
    # In this case Unlocking the items on the cart just
    # moved to the abandoned state.
    Item.unlock_form_cart(cart)
    cart
  end
end
And there it is, we have a simple and straightforward implementation of a state machine, using callbacks and guard functions with a nice and readable DSL.
Now we can easily create transition it from one state to another making sure all guard and callbacks functions are properly handled.
BONUS: Dashboard for your State Machine
If you’re using Phoenix and want a visual dashboard representing your state machine (its states and each resource), you can easily have it. It will also enable you to change states by dragging it from one state to another. (pretty much like Trello)
This is how it looks like:
To enable the Machinery Dashboard all you need is to:
- Add the plug
Machine.Plugto youEndpointmodule. ```elixir defmodule YourApp.Endpoint do # …
# It accepts the path you want to mount the dashboard at as an argument,
# it will mount it under /machinery as default.
plug Machinery.Plug
# plug Machinery.Plug, ‘/my-custom-route’
# … end
2. Add the proper config to `config.mix`
- **interface:** a flag to enable the dashbord.
- **repo:** your app's repo module.
- **model:** the model that will hold the state.
- **module:** the machinery module where you have the declared states.
- *(Optional)* **dashboard_states:** A list of the states you want on the dashboard.

```elixir
config :machinery,
  interface: true,
  repo: YourApp.Repo,
  model: YourApp.User,
  # Optinal: dashboard_states: ["created", "partial"],
  module: YourApp.UserStateMachine
That’s it, now you can start you Phoenix app and navigates to http://localhost:4000/machinery, or whatever custom routes you have mounted the dashboard at.
Wrapping up
I hope you have liked the article and have fully understood what is a state machine, how it works, and how you can easily build one into your elixir project using machinery, even if it isn’t a Phoenix app.
I’d love to hear a feedback from you, so please let me know on the comments bellow and over twitter.
You can also check and help the Machinery project by checking it on Github.